Friday, February 26, 2016

Fastest install yet

Since the original fixture did not require the mount bracket and attached directly to the box, it was just a matter of removing the fixture and screwing on the threaded bracket.


Securing the ground wire and wire nutting the two main wires.

Thread the the supplied threaded tube into the bracket, sliding the lamp assembly onto that tube then placing the bezel on it and tightening the cap nut.

from start to finish about four minutes, it took longer bringing in the step stool, drop light and screwdrivers (original screws were slotted, replacements Phillips) and then putting them away afterwards then the install.


Paying attention is important

For the game room I have decided to build shelves along all the half walls. The shelves will be used to hold games, discs and old vhs tapes, roughly 500 worth.

I have decided that the strongest design would involve Dado cuts, but did not have a table saw. sitting at work one Saturday I went on line with Home Depot and I ordered a Table saw and a scroll saw.

It was just like the insurance ads, "You thought you were covered for this, but..."

I checked out a number of saws including the Dewalt worksite saw with roller base. After looking at many choices I decided on the Dewalt and I ordered it.

Except what I thought I had saved as a favorite was not that combo, So when the order arrived I had..
So another visit on line got the rolling system ordered and since I was placing the order I also ordered a stand for the scroll saw, Dado blades, a Dado guard and a table extender.

Getting all these objects home and stacking them in the dining room along with the two saws reminded me of Tim Allen. 
"Some assembly required, "Ooooh Noooo, you can hurt yourself"


Hallway illumination

The style of lamp fixtures in the house vary a bit, so I am keeping with that tradition. All the new units are LED but the mounting styles vary a bit, still, easy to install.

The existing hall light used the same two screw mount as usual but the socket itself was a screw in ceramic style with gasket.
This came down and was removed very quickly. 


Since the new fixture does not use a two screw and twist slot system, that too was removed
 It was replaced with the new bracket which came with the lamp and uses a threaded rod and nut mount.

Two screws to hold the bracket to the box, then twist lock the wires.


Slide the lighting unit up along the threaded tube and tighten with the supplied gasket and nut.


Three screws to hold the glass dome on and ..done.


If you are to do one of these replacements may I suggest two useful items,  a step stool of some sort and a drop or spot light to see what you are doing.

Next will be the two downstairs rooms, bedroom and den.


Tuesday, February 16, 2016

Since I have been hanging out at home depot

I may as well switch the entire house over, this should take care of both outside lights (screw in LED bulbs), both bedrooms, the den, the bottom of the staircase, and the bathroom.

They are a little expensive but when you install a ceiling lamp that is equivalent to two 75 watt bulbs and only using 24 watts to do it, it has to save in the long run, and that is just one fixture.

Saturday, February 13, 2016

Something else new to put together.


Switching over the lighting to LED

There are a number of new installations of Light Emitting Diode  (LED) fixtures installed and where the existing fixtures are in use new LED bulbs are being installed. LED uses less power, produces no heat, and creates a great deal of light. The downside of switching over is the cost. A standard LED bulb in the 100w range goes for about $25. Many of these fixtures I am currently installing regular style LED bulbs in will be switched over to LED fixtures later, but there are enough standard fixtures which will remain after I am done.
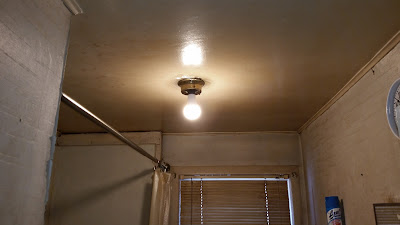


(As you can see, this is the bathroom which will have a major overhaul, tub removed, shower installed, closets redesigned, and the walls pretty much replaced. This room will be the last room done as it will cost the most)

I figured I would show you how easy an LED fixture goes up.


Step one is always the same, make sure the power is off,

             Remove the lamp glass and bulb

Loosen the two support screws, rotate the fixture so the screws can slide through the wide part of the slot and lower the fixture. Loosen and remove the wire nuts and discard the fixture.


The new system will have new screws, nuts and a socket/wire assembly


Attach the new socket and secure with the nuts


The kit also comes with a adapter plate, this may or may not be needed, screw the assembly into the socket and tuck the wires up inside the ceiling.


Raise this attachment up and see if the existing screws line up with the new fixture, if they do you will not need the adapter plate. If they do not secure the adapter plate to the box with the two short screws supplied.

The new plate has a green ground screw on it, if the box is already grounded this will not be necessary to use.

The new kit also comes with new long screws, once again test fit the attachment, if the new screws are too long to tighten into the existing box you can use the originals, if the originals are too short to reach through the new lamp use the longer screws. Be careful not to screw into the wires in the box. 


Slide the fixture holes up over the screws, rotate to the slotted end of the opening and tighten.


At this point you can test the unit, turn the power on

The last step is the dome, it has three notches which line up with three lips on the unit, push up into the notches and rotate.

You are done, put away your tools and vacuum the floor for any ceiling debris or insullatio n which may have fallen.


Are you good or what?

Wednesday, February 3, 2016

Fire Alarm


The Fire Alarm System in the house was installed in the 1960's. it worked off heat sensors strategically placed throughout the house. The system has been out of service for some time and has just been sitting dormant with the power feeds removed. The sensors are still in every room of the house, I left them there pretty much for nostalgia. the box needs to be removed now because the cutoff switch panel for the generator needs to go there.


So I chopped the sensor feed wires and took the panel down, Four screws, no big deal.


The emergency power source looks like it has seen better days, a little corrosion.


Are those batteries suppose to be still in use after 38 years?
September 27, 1978... That was my high School Graduation year.

Anyway, the box is down and the space is open.

I still haven't decided what to do with the choo choos, the progress on the layout came to an abrupt halt after the $1000.00 Digi-trax control system and a few $400.00 and $500.00 digital engines were stolen a few years ago.
I thought many times about getting back into it, but....I don't know.


The pleasure of working on it was pretty well murdered by the theft, not to mention having to buy all that stuff again is prohibitive.

So, for now it will continue to sit and collect dust, and florescent light bulbs, tools, jars, nuts and bolts, and anything else that gets dropped on the layout.